

Monday, April 30, 2012
Thursday, April 26, 2012
Project Duncan- Week 5

So, that being said, Storybord Pro and I will become friends this summer, not in the next week. Photoshop and I shall duke it out until then.
I set out to focus on the couple things that were most bothering people with my Animatic last week
1. Walk Cycle
2. Lady


Thursday, April 19, 2012
Project Duncan- Week 4
OKAY here we go...
Basic animatic...DONE-ZO. One of my transitions I changed, because camera angle change seemed to be extra complicated in PS. It may change back once i'm in storyboardpro. what do you think?

Basic animatic...DONE-ZO. One of my transitions I changed, because camera angle change seemed to be extra complicated in PS. It may change back once i'm in storyboardpro. what do you think?

Wednesday, April 11, 2012
Project Duncan- Week 3
Progress!
This takes a lot longer than I thought. I'm still making pieces and parts in photoshop, and frankly I wonder if I may just end up staying in photoshop...we shall see.
Anyways, animatic progress:

and reference/etc. for next parts:
This takes a lot longer than I thought. I'm still making pieces and parts in photoshop, and frankly I wonder if I may just end up staying in photoshop...we shall see.
Anyways, animatic progress:

and reference/etc. for next parts:

Thursday, April 5, 2012
Project Duncan- Week 2 Part 2
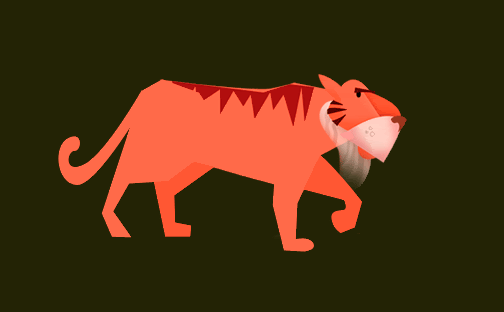
This is a "walk cycle" that I did for my tiger. I have never done one, nor do I really know how to do one. I looked at the little sign in class that says there are 4 steps, and then you do the inbetweens...but since I'm only doing an animatic, I figured this could be too.
anyways, here it is:
anyways, here it is:

Monday, April 2, 2012
Project Duncan- Week 2 Part 1
Working on environments and the other characters:

Also re-thinking some of my transitions:

Also re-thinking some of my transitions:
Tuesday, March 27, 2012
Project Duncan- Week 1
Hello all :D
If you haven't seen my previous posts, I am doing an animatic for my final project. This is based on the World Wildlife Fund's articles about tigers in Sumatra losing their home to paper companies. Articles One & Two on the WWF website awoke my awareness, and lit a fire inside me to do a PSA about this.
Here's what I have so far:
Main Character/ His Environment:
Story:

Plan of Attack:
As a senior, I only have 5 weeks left from today (EEEK!)
I am still trying to determine how to go about this. I think the best way to do it, and make sure I can complete it...I'll start by doing Key Frames, and then each week fill in more and more, always thinking about the animatic at a whole. Therefore, no matter what point I stop at, I'll still feel the animatic is 'complete'.

If you haven't seen my previous posts, I am doing an animatic for my final project. This is based on the World Wildlife Fund's articles about tigers in Sumatra losing their home to paper companies. Articles One & Two on the WWF website awoke my awareness, and lit a fire inside me to do a PSA about this.
Here's what I have so far:
Main Character/ His Environment:

Story:

Plan of Attack:
As a senior, I only have 5 weeks left from today (EEEK!)
I am still trying to determine how to go about this. I think the best way to do it, and make sure I can complete it...I'll start by doing Key Frames, and then each week fill in more and more, always thinking about the animatic at a whole. Therefore, no matter what point I stop at, I'll still feel the animatic is 'complete'.

Wednesday, March 14, 2012
Wednesday, March 7, 2012
Project Ron Saks- Week 3 Part 4
On tuesday, each member of the group took a piece of the story to create a mini animatic...or get done as much as they could.
The goal is to be able to switch parts, and be able to clean up someone else's work. This, in theory, will promote a more cohesive transition between parts and use of design and color.
Here's what I came up with for my part...

The goal is to be able to switch parts, and be able to clean up someone else's work. This, in theory, will promote a more cohesive transition between parts and use of design and color.
Here's what I came up with for my part...

Saturday, March 3, 2012
Project Ron Saks- Week 3 Part 3
Emily and I decided to do color studies for the final storyboard, so that when we all split up to animate, we will all be in agreement about what the colors should be. We chose a very condensed palate, and each of us are coloring half of the frames.


Project Ron Saks- Week 3 Part 2
Cleaned up story board:
colored version to come.
Our team thought about changing the ending of the story, to something even more unpredictable...but a lot of the things suggested would require more work than these <2weeks can provide. So we are sticking with our original decision. :D


colored version to come.
Our team thought about changing the ending of the story, to something even more unpredictable...but a lot of the things suggested would require more work than these <2weeks can provide. So we are sticking with our original decision. :D


Thursday, March 1, 2012


Tuesday, February 28, 2012
Project Ron Saks- Week 2 Part 1
After each of us completed our own thoughts/sketches for the project, we met up and decided who would lead which aspect of the project:
Mandy and Kimmy are doing Character Development
Jason is doing Environments (A bit of a curve ball i threw his way, but he can handle the challenge :D )
and Emily and I are doing Storyboard/key frames.
In class, Emily and I came up with this as a starting point for our Story:
Red (innocent/fierce) walking in field, carrying a shot gun
come upon forest. Red cocks her gun, ready for anything.
Title sequence.
-Walks into forest and through forest, shows passage of time
-Hears a Rustle in the bushes
-scared, points gun, but doesn't shoot. Figures it's nothing, pulls herself together, and walks on
-eyes peer out from bush.
-walking, silhouette runs across foreground.
-walks more.
-squirrel makes noise, Red shoots, just missing the squirrel. It looks like a deer in the headlights as it freezes. Squirrel pushes nut toward Red, as an offering, thinking "i'll give you this nut, just PLEASE don't kill me".
-Red, realizing that it's just a squirrel, calms down, and ignores the squirrels offering (maybe steps on it?) Hardened by her search for the wolf.
- SUPER BAD-ASS MODE ACTIVATED.
-walks deeper into forest, everything getting darker/less saturated
-See silhouette run past again.
-Silhouette high above her, looming over her. She realizes this and points her gun in his direction. Moves the leaves of the bushes out of the way and sticks the barrel of her shot gun in his face.
-HER face shifts from a look of anger/scared to confused/mesmerized
-we see puppy. she cocks gun, and dog cocks head.
-she drops the gun, looking positively hypnotized by this puppy, and hugs him.
-dog looks at camera over her shoulder, face drops from happy/adorable puppy to an angry malicious smile.
the wolf wins again.
Project Ron Saks- Week 1.5
As soon as our group found each other, we clicked right away. We have edited our story line, and have begun the beginning stages of our character and environment development.
As Team Director, I put together a calendar for the team:
BEFORE T, 2-28:
-Discuss Storyline, & Make Adjustments.
-Latest Story Rendition:
beginning: going into the woods, cute and innocent but very confident.
middle: walking in forest, as it gets darker and shadows are getting darker. Starting to feel a little
eerie. Things rustling in bushes...and she starts to get really nervous. Sees small animals, and
freaks out (like when Rapunzel freaks when theres the bunny in tangled)
end: puppy.
we could have her hug the puppy..and the puppy could have an evil grin...like he’s the wolf
underneath (with vicious fangs, a vicious smile, and a twinkle of red in his eye ... exaggerated a lot)
....foreshadowing that he’s tricked her again?
Suggestion:
-Go to the Library to look at Art Of Pixar Books/inspiration.
T, 2-28:
-Talk about Characters (age, weight, appearance, ...is she human? etc.) /Environment (woods? park?
etc.)
- Talk about Style & Inspirations- Lorelay Bove, Pascal Campion, Brittney Lee
-Divide the work: (Suggestions of how to divide?)
Character Development (Finalized Sketches)-
Environments (Finalized Sketches) -
Storyboard i.e. how story will flow-
**Focus on composition and "Design" of characters/environment more than details.
-Work in Class.
10.30 show/discuss progress.
R, 3-1:
-Review work done (sketches, etc)
Critique.
- Character Developers- color studies for tuesday
- Environmentalists (lol)- color studies for tuesday
- Boarders- Key Frame Drawings for tuesday
Please Post Progress to Blog by tuesday.
T, 3-6: Sophomore/Junior Reviews. Still meet?
- Critique color studies/final critique on character/environment designs/Key Frames
- Each person take a chunk of the story (split 5 ways)
Use sketches/key frames to put together your piece of the story. Make it fun and exciting. Watch "Glen
Keene Animates a Scene"
- Consider Squash/Stretch, Straight vs. Curve, etc.
Post Your Piece for thursday on the blog. Bring file on flash drive so we can put them all together in
class, and see how it reads.
R, 3-8:
-Critique Clips. What could we add/subtract to make them better. How do they flow?
-Reassign Clips, and "finish" one that someone else started using pre-designated palate (from color
study findings) so everything flows.
Please Post by tuesday, and bring on flash drive.
T, 3-13:
- Last critique
- Final Edits
- In a perfect world, we can piece the whole thing together by the end of class, and be ready for
Thursday. :D
For Today, we each did sketches/thoughts:


><br><br>Walks into forest/through forest, show a passage of time with clips and breaks.<br>Hears a rustle in the bushes.<br>scared, holds up gun...doesn't fire.<br>Collects herself, starts walking again....we see eyes in bush behind her.<br>Shadow/silhouette runs across foreground (red walking in "background")<br>Squirrel makes noise, Red fires her gun, and just misses the squirrel. Squirrel freezes, not sure of what to do ...so he offers Red his nut as an offering for her refraining from killing him.<br>She, realizing its just a squirrel, collects herself, and goes into "SUPER BAD-ASS MODE"<br>Walks further. Woods getting darker.<br>See silhouette again running past.<br>"Wolf" sits...feel it looming over her. She sees it and raises up her gun to shoot, and shifts the leaves of the bushes out of the way.<br>Watch her face change from angry/scared to excited/mesmorized. <br>Little puppy is staring at her, and cocks his head.<br>she drops the gun and pulls the puppy up into her arms.<br>Puppy looks into camera, and gives vicious, evil grin with a gleam of "i got her" in his eye.<br><br>The wolf wins again.<br><br><br>
As Team Director, I put together a calendar for the team:
BEFORE T, 2-28:
-Discuss Storyline, & Make Adjustments.
-Latest Story Rendition:
beginning: going into the woods, cute and innocent but very confident.
middle: walking in forest, as it gets darker and shadows are getting darker. Starting to feel a little
eerie. Things rustling in bushes...and she starts to get really nervous. Sees small animals, and
freaks out (like when Rapunzel freaks when theres the bunny in tangled)
end: puppy.
we could have her hug the puppy..and the puppy could have an evil grin...like he’s the wolf
underneath (with vicious fangs, a vicious smile, and a twinkle of red in his eye ... exaggerated a lot)
....foreshadowing that he’s tricked her again?
Suggestion:
-Go to the Library to look at Art Of Pixar Books/inspiration.
T, 2-28:
-Talk about Characters (age, weight, appearance, ...is she human? etc.) /Environment (woods? park?
etc.)
- Talk about Style & Inspirations- Lorelay Bove, Pascal Campion, Brittney Lee
-Divide the work: (Suggestions of how to divide?)
Character Development (Finalized Sketches)-
Environments (Finalized Sketches) -
Storyboard i.e. how story will flow-
**Focus on composition and "Design" of characters/environment more than details.
-Work in Class.
10.30 show/discuss progress.
R, 3-1:
-Review work done (sketches, etc)
Critique.
- Character Developers- color studies for tuesday
- Environmentalists (lol)- color studies for tuesday
- Boarders- Key Frame Drawings for tuesday
Please Post Progress to Blog by tuesday.
T, 3-6: Sophomore/Junior Reviews. Still meet?
- Critique color studies/final critique on character/environment designs/Key Frames
- Each person take a chunk of the story (split 5 ways)
Use sketches/key frames to put together your piece of the story. Make it fun and exciting. Watch "Glen
Keene Animates a Scene"
- Consider Squash/Stretch, Straight vs. Curve, etc.
Post Your Piece for thursday on the blog. Bring file on flash drive so we can put them all together in
class, and see how it reads.
R, 3-8:
-Critique Clips. What could we add/subtract to make them better. How do they flow?
-Reassign Clips, and "finish" one that someone else started using pre-designated palate (from color
study findings) so everything flows.
Please Post by tuesday, and bring on flash drive.
T, 3-13:
- Last critique
- Final Edits
- In a perfect world, we can piece the whole thing together by the end of class, and be ready for
Thursday. :D
For Today, we each did sketches/thoughts:


Wednesday, February 22, 2012
Project Ron Saks- Week 1
 Story: A red riding hood spoof/sequel.
We see Little Red is in the woods searching for the wolf (gun in basket) and something with scary eyes keeps looking at her from the bushes, and rustling the leaves and then we see a shadow hover over her, and her face is scared, and all of a sudden it changes to surprise/excitement because its just a little puppy. :D
Need: People who like to draw, people who know/want to know things about after effects or another program with which to animate, people who are willing to work hard toward an awesome goal :P
# of People: 4-5
Style: Looking for inspiration from Pascal Campion and Brittney Lee. Focus on color/palate/lighting, well designed compositions, and technology
Week 2: Sketches for character, environment, color studies, storyboard keyframes
Week 3: Sketch animated, each person takes a piece and makes it cohesive and exciting.
Week 4: Final Cleaned Up. Take someone else's piece from the week before to clean up.
I HOPE YOU VOTE FOR MINE <3 It's probable that things will change, as 4-5 minds are much more clever and entertaining than just one!
Sunday, February 19, 2012

Thursday, February 16, 2012
Project Hiroshi- Week 4
TA-DA!
The Sound isn't working correctly, I tried uploading it to photobucket, vimeo and youtube.
BUT I did upload it to my dropbox public folder, and all the sound works fine (or so i hope!): http://dl.dropbox.com/u/21078363/Final%20Bunny%20Animation2.mov {dropbox file}
The Sound isn't working correctly, I tried uploading it to photobucket, vimeo and youtube.
BUT I did upload it to my dropbox public folder, and all the sound works fine (or so i hope!): http://dl.dropbox.com/u/21078363/Final%20Bunny%20Animation2.mov {dropbox file}
Sunday, February 12, 2012
Project Hiroshi- Week 3.5
I switched back to Photoshop for convenience sake. I shall tackle After Effects another day.
Progress>>
Thursday, February 9, 2012
Project Hiroshi- Week 3
So, in edition to the other 2 experiments...here's my bunny sketches a-movin'!
Huzzah!
PS: i learned you can render videos from photoshop! whoodathunk?
Huzzah!
PS: i learned you can render videos from photoshop! whoodathunk?
Tuesday, February 7, 2012
In class Notes 2.7.12
Before I forget! Here we go:
TODAY I LEARNED HOW TO OPEN AFTER EFFECTS! :D
Here's What I learned:
-Open After Effects
-Your layer panel is on the left, holding all of your "back stage" elements, the Composition is the big rectangle in the middle, which acts as your "stage", and below is the timing and timeline.
-Click "Composition" in top, and New Composition
-Name your composition, select the file size, frame rate (24) and time. click ok.
-Now your composition is "backstage" YAY!
-File SaveAs....save this AEP file in the same place your psd/other files are that you are about to import.
-Next you go to file, import, and import your selected file. This will also show up in your layer panel on the left. You can now drag elements onto the composition and use the timeline below to edit.
-When saving, pull up your "Render Queue" which will overtake the timeline window.
-Drag down your most recently saved composition. Play with the clickable options to get a .mov file (pick quicktime not the .avi) and hit Render. <>
Here's what I got done in class today :D
Hungry Bunny v1 from Monica Cronin on Vimeo.
Sunday, February 5, 2012
Experimentin'
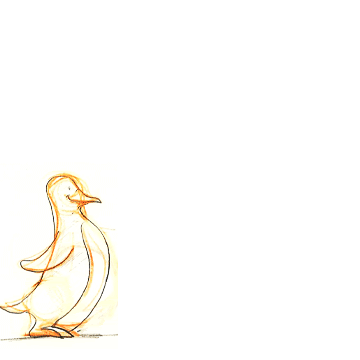
Playing with GIFs in PS...what fun! I wanted to experiment with Squash/Stretch, so naturally I drew a penguin jumping :D

Saturday, February 4, 2012
Project Duncan- beginning steps
So, I'm getting a bit of a head start on my third project for this class, because I am also working on it in my Independent Study. I will use this post to catch you up to what I have been working on, and how everything is coming along.
Click on the links below to view each step:
RESEARCH and Inspiration
STORYLINE
COLOR & STORYBOARD
Click on the links below to view each step:
RESEARCH and Inspiration
STORYLINE
COLOR & STORYBOARD
Thursday, February 2, 2012
Project Hiroshi- Week 2


This first project, like I said in my last post, is more about the animation and mechanics of creating an animated image than it is about showing off my drawing/concepting skills.
So here we have more sketches, and some preplanning of details, logo, and environment for the animated final.
Tuesday, January 31, 2012
In Class Notes 1.31.12
Animated Gif in Photoshop.
Charlotte gave a presentation today on Animating in Photoshop, what timing and spacing are, and how you can use them to make your animation look natural. We practiced with an animal turning its head. Also she gave us these two links for future learning/reference:
http://www.michaelspornanimation.com/splog/?p=873
 http://www.animationmentor.com/webinar/timing-and-spacing-webinar/
Key Information I didn't know Before:
Timing: Timing is the main story drawings. These are the Narrative, Key Drawings that are cleaner and more well thought out. These need to be held longer than the Spacing drawings, or at least to need to appear to be held longer.
Spacing: Spacing are the in-between drawings. These are what give the animated look.
Animating on 2s: 1 drawing every 2 frames. Most animation is on 2s, although if there is a lot of camera movement or dancing or something that changes a lot, it will be on 1s. "2s" refers to each drawing is held for 2 frames.
Evenness is evil, that's why animators are odd. BAHAHA.
Getting started:
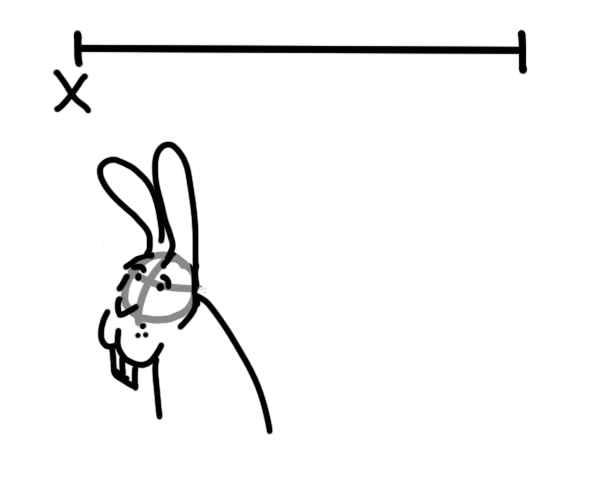
We started with a Timeline. Drawing X on the left, and Drawing Y on the right. These are the Timed Drawings. Between those, there are spacing drawings, M, 1, 2, 3, &4. M is the Midpoint, 1 is the 3/4 and 2 is the 7/8 points. Click here for a diagram. You want to focus your attention in the motion closer to your Timed Drawings, so that they appear to hold longer than the midpoint spacing drawing.
Now, create layers titled "X, 4, 3, M, 1, 2, Y, E" And draw the Timing Drawings on X and Y.
Then go to window>Animation Menu to pull up the timeline. {Note: if you hit the button in the bottom right of the pop up window, it will show the frames on a timeline}
Then go to the pull down menu in that window, and click on "Document Settings" to change the frame rate to 24 frames/sec. Animation is done on 24 Frames per second, based off of the persistence of vision in film footage. ALSO, change the Duration to 0:00:01:00. Duration is set up to be HR: MIN: SEC: FRAMES, so setting it to this will tell PS there are 24 frames in this 1sec.
NOW LET'S ANIMATE!
Click on the M layer, and draw the head halfway through the motion. KEEP IN MIND:
1. the head will dip down, because that is what a head naturally does when it turns.
2. the eyes will shut, because all species blink when they turn their heads.
3. Push the weight toward the direction you are going, and let the features drag behind.
4. Distort as head passes thru, don't have to worry about details until the end.
When drawing any of the spacers, look at both at the frame directly before and after, to get a good inbetween image. These can be very loose, just to show the movement of the key pieces.
After you have X, 4,3,M,1,2, Y Draw E. E stands for "Extra" to push the character slightly past your final drawing.
Then copy your Y layer, and have that be the hold for the remaining of the 24 frames. Theoretically in an animation, when a head turns, it should hold or flip back and forth with E for a 12 frame period.
If you haven't already, make each of these layers last for 2 frames (it should snap into place in PS). in the order of X,4,3,M,1,2,Y,E,Y and turn the Onion skinning on (square with striped circle inside).
I've included the GIF i created quickly in class. YAY! ANIMATING!
I hope that was clear. Comment if it wasn't and I can reword/change things :D
Charlotte gave a presentation today on Animating in Photoshop, what timing and spacing are, and how you can use them to make your animation look natural. We practiced with an animal turning its head. Also she gave us these two links for future learning/reference:
http://www.michaelspornanimation.com/splog/?p=873
Key Information I didn't know Before:
Timing: Timing is the main story drawings. These are the Narrative, Key Drawings that are cleaner and more well thought out. These need to be held longer than the Spacing drawings, or at least to need to appear to be held longer.
Spacing: Spacing are the in-between drawings. These are what give the animated look.
Animating on 2s: 1 drawing every 2 frames. Most animation is on 2s, although if there is a lot of camera movement or dancing or something that changes a lot, it will be on 1s. "2s" refers to each drawing is held for 2 frames.
Evenness is evil, that's why animators are odd. BAHAHA.
Getting started:
We started with a Timeline. Drawing X on the left, and Drawing Y on the right. These are the Timed Drawings. Between those, there are spacing drawings, M, 1, 2, 3, &4. M is the Midpoint, 1 is the 3/4 and 2 is the 7/8 points. Click here for a diagram. You want to focus your attention in the motion closer to your Timed Drawings, so that they appear to hold longer than the midpoint spacing drawing.
Now, create layers titled "X, 4, 3, M, 1, 2, Y, E" And draw the Timing Drawings on X and Y.
Then go to window>Animation Menu to pull up the timeline. {Note: if you hit the button in the bottom right of the pop up window, it will show the frames on a timeline}
Then go to the pull down menu in that window, and click on "Document Settings" to change the frame rate to 24 frames/sec. Animation is done on 24 Frames per second, based off of the persistence of vision in film footage. ALSO, change the Duration to 0:00:01:00. Duration is set up to be HR: MIN: SEC: FRAMES, so setting it to this will tell PS there are 24 frames in this 1sec.
NOW LET'S ANIMATE!
Click on the M layer, and draw the head halfway through the motion. KEEP IN MIND:
1. the head will dip down, because that is what a head naturally does when it turns.
2. the eyes will shut, because all species blink when they turn their heads.
3. Push the weight toward the direction you are going, and let the features drag behind.
4. Distort as head passes thru, don't have to worry about details until the end.
When drawing any of the spacers, look at both at the frame directly before and after, to get a good inbetween image. These can be very loose, just to show the movement of the key pieces.
After you have X, 4,3,M,1,2, Y Draw E. E stands for "Extra" to push the character slightly past your final drawing.
Then copy your Y layer, and have that be the hold for the remaining of the 24 frames. Theoretically in an animation, when a head turns, it should hold or flip back and forth with E for a 12 frame period.
If you haven't already, make each of these layers last for 2 frames (it should snap into place in PS). in the order of X,4,3,M,1,2,Y,E,Y and turn the Onion skinning on (square with striped circle inside).
I've included the GIF i created quickly in class. YAY! ANIMATING!

I hope that was clear. Comment if it wasn't and I can reword/change things :D
Monday, January 30, 2012
Out of Class Notes
Please feel free to check my drawing blog "Monica Is Drawing" to read about what I am learning from Walt Stanchfield's book "Drawn to Life".
Also, if you would like to read about Dave Pimentel's opinions of this book, and of Walt himself, click here.
Since this is all brand new to me, I feel I need to do a lot of catching up. This first post is about the principles of Squash and Stretch, and how they effect an animation that is full of life. Please check out these posts if you would rather not purchase the book for yourself (although I highly suggest it).
Thursday, January 26, 2012
In Class Notes 1.26.12
Technically today was not a "notes" kind of a day...but I did learn a new concept today that I wanted to talk about on here.
Straight vs. Curve
This idea suggests that for every straight line there should be a curved line. Dave Pimentel actually does a fantastic job describing this technique here. In short, parallel and perpendicular lines are not nearly as interesting as line that intersect or may someday intersect, and are more interesting still if one is straight and the other curved. This provides a drawing with a sense of fluidity and feels more natural that things that are all curves or all straight lines.
Also we got to talking about 101 Dalmatians, and people looking like their dogs...which is SUCH an accurate thing to say, because it is SO TRUE. Most people you see at the park walking/running with their dog...usually have similar features to their beloved pet. Anyways, here is the link : http://www.michaelspornanimation.com/splog/?p=2890
Have a Happy Weekend!
In Class Notes 1.24.12
I want to post in-class notes on here
1. To immortalize it, so I can't lose my notes
2. To process what I learned a few days previous, in hopes for better retention
Charlotte's Lecture:
1. Joseph Canzani is part of all of us. He taught us things like 50% grey mat board is the best color to make your artwork look its best, and that Elvis was a decent musician. www.josephcanzani.com
2. Making a Contact Sheet:
-Open images in Bridge
-click "output"
-US Paper, Quality 150, columns X, Rows X, keep/leave filename, refresh-->do again till happy
-Hit save.
****ANIMATORS: this is a quick way to build a storyboard
3. Color:
www.colorschemedesigner.com
4. Unsharp Mask, to make a rich film look to images
- Make Copy of Layer, Layer Adj, Desaturate
-Filter, Sharpen, Unsharp Mask, [Amount Up, Radius, Threshold Down] Need and Alpha Mask (layer mask)
5. Coloring in PS
-Copy linework into layer mask. On new layer, fill layer with black and then invert. Lock pixels and paint away :D
6. UNDO IN PHOTOSHOP: Cntrl+Alt+Z
-OMG WHAAA?!
Matthew's Lecture:
1. The MOST difficult thing for many an artist is Online Visability and Promoting their Work.
Different types of Visability:
1. Flickr/Reddit/DeciantART: semitargetted community, immediate feedback, but it is hard to stand out in the sea of images. click*click*click. However, Coey Kuhn (Graduate of Aurora High School AND CCAD) seems to be doing alright for herself off deviantart.
2. Behance/Creative Hotlist/Krop/Dribble/Carbonmade: industry oriented and you have a collection of work presented.
3. Facebook Page for Artist: Post links, get likes, strong community.
4. Monthly Newsletters: Image, how did it, how job came up, Stay Tuned for this great thing I'm doing next month! conceptcontent.com>>plug in email addresses to send newsletter to.
5. Blogging: Long form of online portfolio, to see an artists successes and failures, sketches and process. You are engaged on this one page, because you looked this person up, and can see a history of the artist.
2. The Marketing Plan: Define a Marketing Plan:
Define your objectives, your demographics, ideal clients
Develop content/place holders for content on a 3-6 month basis
Gantt Chart- Timeline vs Tasks. When you will update each thing, and how often.
1. To immortalize it, so I can't lose my notes
2. To process what I learned a few days previous, in hopes for better retention
Charlotte's Lecture:
1. Joseph Canzani is part of all of us. He taught us things like 50% grey mat board is the best color to make your artwork look its best, and that Elvis was a decent musician. www.josephcanzani.com
2. Making a Contact Sheet:
-Open images in Bridge
-click "output"
-US Paper, Quality 150, columns X, Rows X, keep/leave filename, refresh-->do again till happy
-Hit save.
****ANIMATORS: this is a quick way to build a storyboard
3. Color:
www.colorschemedesigner.com
4. Unsharp Mask, to make a rich film look to images
- Make Copy of Layer, Layer Adj, Desaturate
-Filter, Sharpen, Unsharp Mask, [Amount Up, Radius, Threshold Down]
5. Coloring in PS
-Copy linework into layer mask. On new layer, fill layer with black and then invert. Lock pixels and paint away :D
6. UNDO IN PHOTOSHOP: Cntrl+Alt+Z
-OMG WHAAA?!
Matthew's Lecture:
1. The MOST difficult thing for many an artist is Online Visability and Promoting their Work.
Different types of Visability:
1. Flickr/Reddit/DeciantART: semitargetted community, immediate feedback, but it is hard to stand out in the sea of images. click*click*click. However, Coey Kuhn (Graduate of Aurora High School AND CCAD) seems to be doing alright for herself off deviantart.
2. Behance/Creative Hotlist/Krop/Dribble/Carbonmade: industry oriented and you have a collection of work presented.
3. Facebook Page for Artist: Post links, get likes, strong community.
4. Monthly Newsletters: Image, how did it, how job came up, Stay Tuned for this great thing I'm doing next month! conceptcontent.com>>plug in email addresses to send newsletter to.
5. Blogging: Long form of online portfolio, to see an artists successes and failures, sketches and process. You are engaged on this one page, because you looked this person up, and can see a history of the artist.
2. The Marketing Plan: Define a Marketing Plan:
Define your objectives, your demographics, ideal clients
Develop content/place holders for content on a 3-6 month basis
Gantt Chart- Timeline vs Tasks. When you will update each thing, and how often.
Tuesday, January 24, 2012
Rocketship Test

OKAY SO IT WORKED.
Trick was to create a Photobucket account and upload it through that.
ANYWHO this is a quick thing i made based off of a tutorial I saw about animating in photoshop.... not anything spectacular...but my first moving animation, Yay!
Monday, January 23, 2012
Project Hiroshi- Week 1


For this Design for Media class, we do 3 projects throughout the course of the semester. Each project is inspired by a faculty member in the department, and then we take our own spin off from there. This Project was inspired by Hiroshi Hayakawa. He has 2 different styles to his artwork [see here], and therefore we had 2 choices with this project. "Figure as Landscape" where the figure blends into or becomes the landscape and the viewer sees first a landscape, and then a figure. Or we could do a menagerie, because Hiroshi enjoys making paper animals, and has created a few books about them, which you can see here.
![[see here]](http://design4media.files.wordpress.com/2012/01/projecthiroshi_crabfigure.jpg)
I chose the first prompt, though my definition of "figure" falls more into the menagerie prompt. I decided to make my main character a bunny, hopping along in a landscape. It is a simple story, but because this is my first animation, I wanted to worry more about the mechanics and less about the storyline.
The animation will start out with a close up on leaves/landscape/foliage (still to be decided) with the bunny hiding among them. The viewer doesn't realize the bunny is there, until it jumps out of the frame. The next sequence is a very zoomed out view of the landscape, where the bunny hops across the frame from left to right. Finally the bunny stops, the background is white, and a piece of the "title" (still to be decided) is visible. The bunny smiles and rears back to take a bite out of the text...and then it cuts to the bunny sitting next to the title...minus a bite.
I think this is something that I can accomplish in 4 weeks, this first week was for planning and sketching, next week I will do the environments and final look of the bunny. Then weeks 3&4 can be dedicated to animation.
Subscribe to:
Posts (Atom)